Crispy Bacon Egg and Cheese Breakfast Quesadillas

Crispy Bacon Egg and Cheese Breakfast Quesadillas are the ultimate cozy, better-than-takeout breakfast. After making these many times, I’ve discovered the trick to perfectly crispy quesadillas every time. The crispy tortilla, melty cheese, and creamy eggs make these quesadillas irresistible. Try them with my Sour Cream and Onion Biscuits for a delicious breakfast combo. If you love recipes like this, you’ll also enjoy Sour Cream and Onion Biscuits and Sweet and Savory Pineapple Chicken and Rice One-Pan Wonder.
Why This Crispy Bacon Egg and Cheese Breakfast Quesadillas Is Pure Comfort
- Crispy tortilla filled with melty cheese and creamy eggs
- Better than takeout and ready in just 20 minutes
- Perfect for a cozy weekend breakfast or meal prep
- Customize with your favorite add-ins
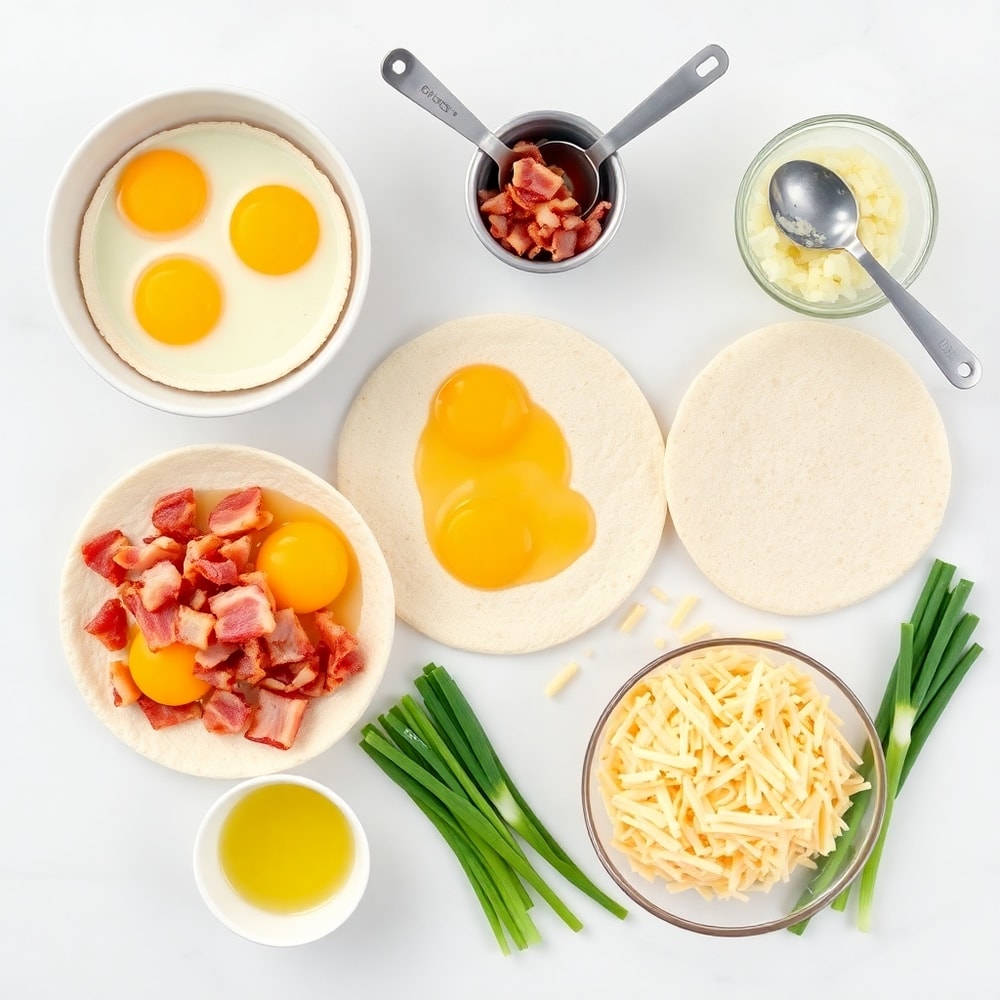
What You'll Need for Crispy Bacon Egg and Cheese Breakfast Quesadillas
Choosing the right ingredients makes a big difference, but this recipe is forgiving enough to work with what you have.
- Flour tortillas
- Eggs
- Bacon
- Shredded cheese
- Green onions
- Salt
- Pepper
- Garlic powder
- Optional: Sour cream
- Optional: Salsa
- Optional: Avocado
📝 Ingredient Notes
- Shredded cheese: Mexican blend, cheddar, or Monterey Jack work well.
🛒 Tools & Equipment I Recommend
- Non-stick skillet — Ensures even cooking and easy cleanup. → See on Amazon
- Tortilla warmer — Keeps tortillas warm while you assemble and cook the quesadillas. → See on Amazon

How to Make Crispy Bacon Egg and Cheese Breakfast Quesadillas
- Step 1: Cook bacon in a non-stick skillet until crispy. Remove and set aside.
- Step 2: In the same skillet, scramble eggs with salt, pepper, and garlic powder. Remove and set aside.
- Step 3: Place a tortilla in the skillet, sprinkle with cheese, add bacon and eggs, then fold in half. Cook until crispy and cheese is melted.
- Step 4: Repeat with remaining tortillas. Top with green onions and serve with your favorite toppings.
Cook's Tips for Perfect Crispy Bacon Egg and Cheese Breakfast Quesadillas
- Common mistake and fix: Don't overcrowd the skillet. Cook quesadillas in batches if needed to ensure even cooking.
- Pro tip: For extra crispy quesadillas, press down gently with a spatula while cooking.
- Pro tip: Customize your quesadillas with your favorite add-ins like spinach, mushrooms, or diced ham.
Storing & Reheating Crispy Bacon Egg and Cheese Breakfast Quesadillas
Short-Term Storage
Store in an airtight container in the fridge. Store leftovers in an airtight container for up to 3 days. Make-ahead tip: Prepare quesadillas ahead of time, then cook just before serving.
Freezing Crispy Bacon Egg and Cheese Breakfast Quesadillas
Freeze cooked quesadillas for up to 2 months. Reheat in the oven or toaster oven.
How to Reheat Without Drying It Out
Oven: Preheat oven to 350°F (180°C), place quesadillas on a baking sheet, and heat for 10-15 minutes. Microwave: Microwave for 30-45 seconds, then crisp in a dry skillet for 1-2 minutes.
Recipe Notes
- Chef tip: Use a non-stick skillet to prevent sticking and ensure even cooking.
- Best substitution: Use a different type of cheese or add-ins to customize your quesadillas.
- Make-ahead: Prepare quesadillas ahead of time, then cook just before serving.
- Scaling: This recipe can easily be doubled or tripled for a crowd.
- Troubleshooting: If your quesadillas are burning, reduce heat and flip more frequently.
Want to level up this recipe?
Tortilla press — Ensures even thickness and helps with assembly. → Check price on Amazon
Crispy Bacon Egg and Cheese Breakfast Quesadillas
Ingredients
Main Ingredients
- Flour tortillas
- Eggs
- Bacon
- Shredded cheese
- Green onions
Seasonings
- Salt
- Pepper
- Garlic powder
Optional Toppings
- Sour cream
- Salsa
- Avocado
Instructions
- Step 1: Cook bacon in a non-stick skillet until crispy. Remove and set aside.
- Step 2: In the same skillet, scramble eggs with salt, pepper, and garlic powder. Remove and set aside.
- Step 3: Place a tortilla in the skillet, sprinkle with cheese, add bacon and eggs, then fold in half. Cook until crispy and cheese is melted.
- Step 4: Repeat with remaining tortillas. Top with green onions and serve with your favorite toppings.
Notes
- Chef tip: Use a non-stick skillet to prevent sticking and ensure even cooking.
- Best substitution: Use a different type of cheese or add-ins to customize your quesadillas.
- Make-ahead: Prepare quesadillas ahead of time, then cook just before serving.
- Scaling: This recipe can easily be doubled or tripled for a crowd.
- Troubleshooting: If your quesadillas are burning, reduce heat and flip more frequently.
Storage
- Fridge: Store leftovers in an airtight container for up to 3 days.
- Freezer: Freeze cooked quesadillas for up to 2 months. Reheat in the oven or toaster oven.
- Oven reheat: Preheat oven to 350°F (180°C), place quesadillas on a baking sheet, and heat for 10-15 minutes.
- Microwave reheat: Microwave for 30-45 seconds, then crisp in a dry skillet for 1-2 minutes.
- Make ahead: Prepare quesadillas ahead of time, then cook just before serving.
Nutrition Per Serving
- Calories: 420
- Protein: 24g
- Fat: 25g
- Carbs: 25g
- Fiber: 1g
- Sugar: 1g
- Sodium: 1200mg
- Cholesterol: 210mg
- Sat. Fat: 12g
Nutritional values are estimates only. Actual values may vary by brand and portion size.
Crispy Bacon Egg and Cheese Breakfast Quesadillas FAQs
Yes, prepare quesadillas ahead of time, then cook just before serving. You can also freeze cooked quesadillas for up to 2 months.
Your heat may be too high. Reduce heat and flip quesadillas more frequently to prevent burning.
Yes, cook quesadillas in the air fryer at 375°F (190°C) for 5-7 minutes on each side until crispy and cheese is melted.
Mexican blend, cheddar, or Monterey Jack work well. You can also use a combination of cheeses.
Yes, place assembled quesadillas on a baking sheet, then bake at 400°F (200°C) for 10-15 minutes until crispy and cheese is melted.
A Warm Final Note
I can’t wait for you to try Crispy Bacon Egg and Cheese Breakfast Quesadillas and see how effortlessly it comes together. When you make it, pop back here and leave a rating or share how it turned out — I love hearing from you!